- This project is just a simple RazorPage web application that consist of CRUD process.
- What is RazorPage?
- What is CRUD?
- What is Entity?
- What is LINQ?
- To run RazorPage on VS Code, click FN + F5 or just F5 on your keyboard. It is depends on your keyboard.
-
Install .Net 5.0 sdk first. For this project, we use .Net 5.0. Below is the link for you to download .Net 5.0 :
-
For database, we gonna use SQL Express because it is lighweight and suitable for development. Install SQL Express before proceed to the next step.
-
To manage your SQL infrastructure, we gonna use SQL Server Management Studio (SSMS). It is better for you to download SSMS version 18.5 or lower because upper version 18.6 and more consist of Azure infrastructure. For this project, we will not use Azure infrastructure. Below is the download link for SSMS.
-
For code editor, we prefer to use Visual Studio Code and not Visual Studio. Below is the download link for VS Code :
-
Then, install C# Extension for Visual Studio Code

-
After you finish setup everything. Now you are ready to proceed to create your first RazorPge project or run this project 😁


-
Download this project and open your terminal or VS Code.
-
On your terminal type this command, but first you need to make sure you know where your project folder is. For my case, I put it on my desktop

code -r RazorPage
-
"RazorPage" name on this command is the folder name of the project. The name is depends on you.
-
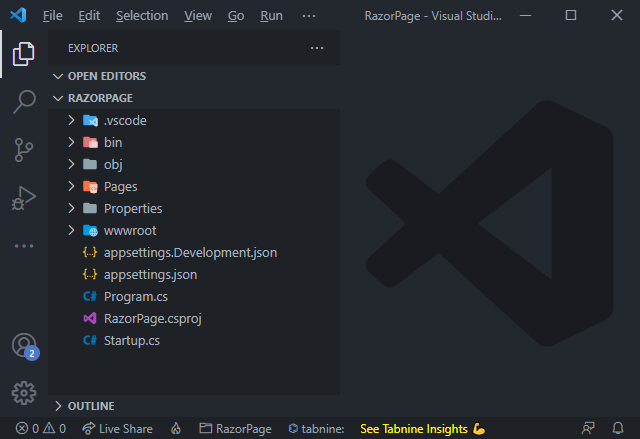
System will open the project on your Code Editor.
-
Other than that, by using VS Code, you can just drag project folder on VS Code and and trust the author.
-
If VS Code authorize you to insert some assets, just click Yes/Accept


-
Open your install VS Code and open VS Code terminal or any terminal that you have.
-
Change to the directory (cd) which will contain the project.
-
Run the following commands :
dotnet new webapp -o RazorPage -
"RazorPage" is the projects name. The name is depends on you.
-
After you finish create the project, you can type this commands on terminal to start code :
code RazorPage -
After VS Code appear, it will show like this on VS Code.
-
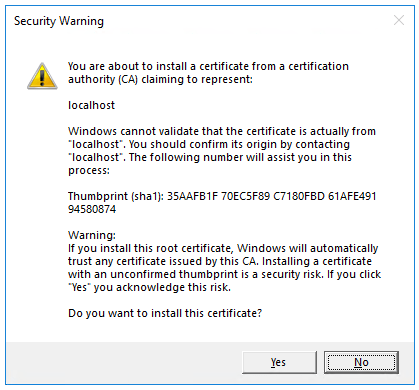
You need to trust the HTTPS development certificate by running the following command :
dotnet dev-certs https --trust -
The preceding command doesn't work on Linux. See your Linux distribution's documentation for trusting a certificate. The preceding command displays the following dialog, provided the certificate was not previously trusted :
-
Select Yes if you agree to trust the development certificate.
-
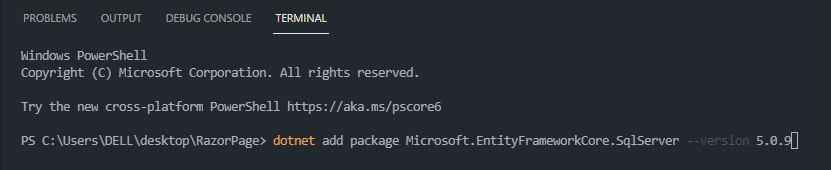
For this project we gonna use 2 package that we need to install. On your terminal inside VS Code, you need to type this commands and click enter :
dotnet add package Microsoft.EntityFrameworkCore.Tools --version 5.0.9
dotnet add package Microsoft.EntityFrameworkCore.SqlServer --version 5.0.9
-
After this package has been installed, you can open your RazorPage.csproj and see whether those 2 package has been installed.


-
Before we start to code, you need to create a database (DB).
-
You just need to create DB using SSMS that we install earlier.
-
Open your SSMS and create a new DB. (How to use SSMS)

-
After you have finished create your DB, create table that consists of 5 field such as below and do't forget to set ID as a Primary Key and as an Identity Column :

-
You will get your result like this after you finished create your DB


-
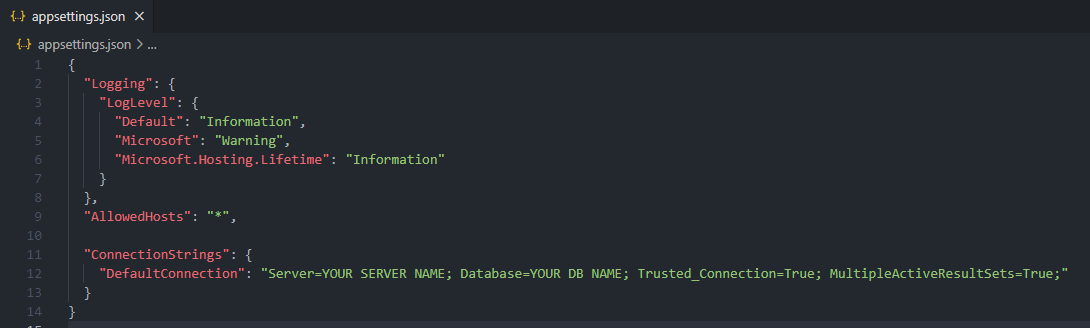
On your project, open appsettings.json file and insert this (If your server name have slash " \ " , you need to insert double slash like this " \ " ):
"ConnectionStrings": {
    "DefaultConnection": "Server=YOUR_SERVER_NAME; Database=YOUR_DB_NAME; Trusted_Connection=True; MultipleActiveResultSets=True;"
 }
-
Save the file.
-
Create a folder name Data and create a new file call DefaultConnection.cs

-
Open DefaultConnection.cs and insert this code :
using Microsoft.EntityFrameworkCore;
using RazorPage.Models;

namespace RazorPage.Data
{
    public class DefaultConnection : DbContext
    {
        public DefaultConnection (
             DbContextOptions<DefaultConnection> options)
             : base(options)
        {
        }

        public DbSet<Table_Razor_Page> Table_Razor_Page { get; set; }

        protected override void OnModelCreating(ModelBuilder modelBuilder)
        {
             modelBuilder.Entity<Table_Razor_Page>().ToTable("Table_Razor_Page");
        }
    }
}
-
If you see error with red lines, don't worry, it is just because we didn't finish create some file that will be use by DefaultConnection.cs
-
Create a new folder name Models and create a new file inside it call Table_Razor_Page.cs .This is an Entity Class that we wil use on our project. You can name this file anything that you want because we just gonna callback the class name inside this file. It is not required to create the file name similar with class name because inside this file, we can include a lot of class and we can callback many class inside this file at similar times.

-
Open Table_Razor_Page.cs and insert this code and you will see the error on DefaultConnection.cs will be gone :
using System;
using System.ComponentModel.DataAnnotations;

namespace RazorPage.Models
{
    public class Table_Razor_Page
    {
         [Key]
         public int ID { get; set; }

         [Required(ErrorMessage = "Please insert Name")]
         public string Name { get; set; }

         [Required(ErrorMessage = "Please insert Date of Birth")]
         [DataType(DataType.Date)]
         public DateTime dateOfBirth { get; set; }

         public DateTime dateTimeInsert { get; set; }

         public DateTime dateTimeUpdate { get; set; }
    }
}
-
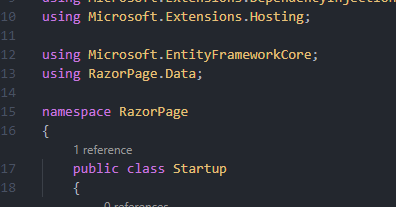
After that, open Startup.cs and insert this code above namespace
using Microsoft.EntityFrameworkCore;
using RazorPage.Data;
-
Then, insert this code as follows :
services.AddDbContext<DefaultConnection>(options =>
            options.UseSqlServer(Configuration.GetConnectionString("DefaultConnection")));


-
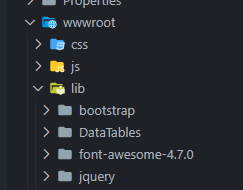
Before we start to code, we need to download library called Datatable, just use default setting when download Datatable. Other than that, we need to download library called FontAwesome.
What is Datatable?
What is FontAwesome?
-
Insert the Datatable library and FontAwesome inside folder lib on wwwroot folder.
-
After that insert this code
<link rel="stylesheet" type="text/css" href="~/lib/DataTables/datatables.min.css"/>
<link rel="stylesheet" type="text/css" href="~/lib/font-awesome-4.7.0/css/font-awesome.min.css" />
inside _Layout.cshtml on


-
Then, we need to insert this code
<script src="~/lib/DataTables/datatables.min.js"></script>
inside _Layout.cshtml on


CRUD Code
-
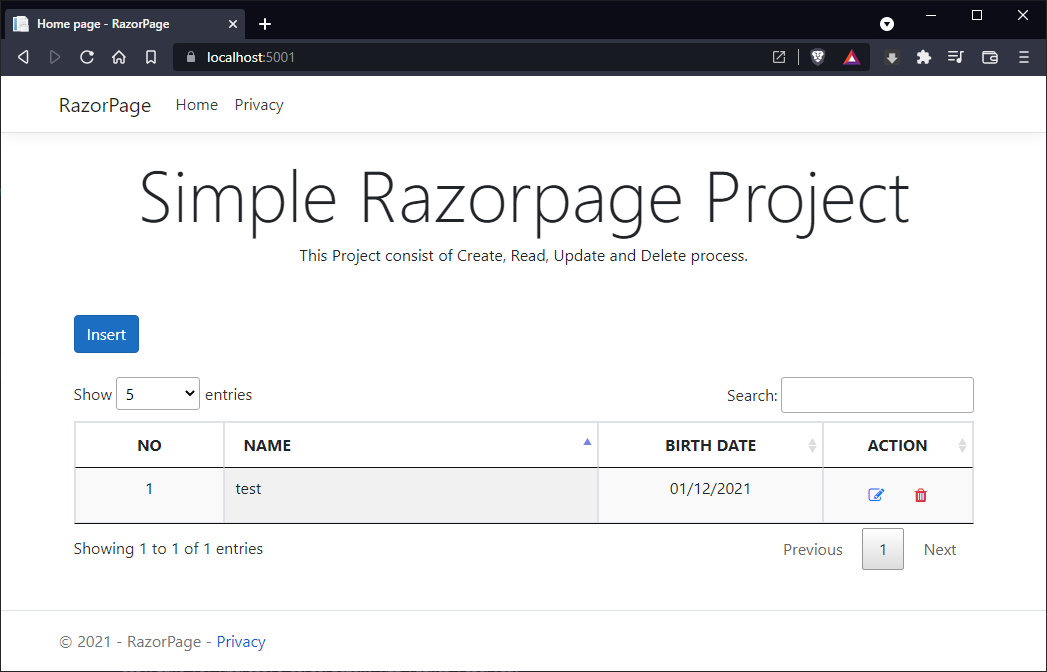
For this project, we gonna use page Index to show one table that consist all data from database table that we have created.
-
Open file Index.cshtml and paste this code (remove old code first) :
@page "{handler?}/{id?}"
@model IndexModel
@{
    ViewData["Title"] = "Home page";
}

<div class="text-center col-md-12">
     <h1 class="display-3 mt-3">Simple Razorpage Project</h1>
     <p>This Project consist of Create, Read, Update and Delete process.</p>

     <div class="text-left mt-5 mb-4">
         <a asp-page="Manage" asp-page-handler="Insert" class="btn btn-primary">Insert</a>
     </div>
     <div>
         <table id="data" class="display table table-striped table-bordered table-sm table-condensed">
             <thead>
                 <tr>
                     <th class="text-center col-md-2">NO</th>
                     <th class="text-left col-md-5">NAME</th>
                     <th class="text-center col-md-3">BIRTH DATE</th>
                     <th class="text-center col-md-2">ACTION</th>
                 </tr>
             </thead>
             <tbody>
                 @for(int i=0; i<Model.view.Count(); i++)
                 {
                     <tr>
                         <td class="text-center"></td>
                         <td class="text-left">@Model.view[i].Name</td>
                         <td class="text-center">@Model.view[i].dateOfBirth.ToShortDateString()</td>
                         <form id="person" method="post">
                             <td class="text-center">
                                 <a class="btn btn-link" asp-page="Manage" asp-page-handler="Update" asp-route-id="@Model.view[i].ID"><i class="fa fa-edit" aria-hidden="true"></i></a>
                                 <button class="btn btn-link text-danger" asp-page-handler="Delete" asp-route-id="@Model.view[i].ID" type="submit"><i class="fa fa-trash" aria-hidden="true"></i></button>
                             </td>
                         </form>
                     </tr>
                 }
             </tbody>
         </table>
     </div>
</div>

@section Scripts {
     <script src="~/js/datatable.js"></script>
}
-
If you got an error, it is because we still didn't edit the code on controller. Open Index.cshtml.cs and paste this code :
using System.Collections.Generic;
using System.Threading.Tasks;
using Microsoft.AspNetCore.Mvc;
using Microsoft.AspNetCore.Mvc.RazorPages;

using Microsoft.EntityFrameworkCore;
using RazorPage.Data;
using RazorPage.Models;

namespace RazorPage.Pages
{
     public class IndexModel : PageModel
     {
         private readonly DefaultConnection _context;

         public IndexModel(DefaultConnection context)
         {
            _context = context;
         }

         public IList<Table_Razor_Page> view { get; set;}

         public async Task<ActionResult> OnGet()
         {
             view = await _context.Table_Razor_Page.ToListAsync();

             if(view==null)
             {
                 view = new List<Table_Razor_Page>();
             }

             return Page();
         }
     }
}
-
You can see that all the errors are gone.
-
After that, create one file inside js folder and name it datatable.js

-
Copy and paste this code inside datatable.js
$(document).ready(function()
{
     var t = $('#data').DataTable({
         pageLength: 5,
         "lengthMenu": [[5, 10, 25, 50, -1], [5, 10, 25, 50, "SEMUA"]],
         "order": [[ 1, 'asc' ]],
         "columnDefs": [
         {
             "searchable": false,
             "orderable": false,
             "targets": [0],
         },
     ],
     });


     t.on( 'order.dt search.dt', function () {
         t.column(0, {search:'applied', order:'applied'}).nodes().each( function (cell, i) {
             cell.innerHTML = i+1;
         } );
     }).draw();
});
-
You can try run the web application first to see whether there is error or not. Click FN + F5 on your keyboard or just F5, depends on your keyboard.
-
You can see that there are no rows on the table because we still didn't insert the data; table inside database is still empty.


-
Create two new file name Manage.cshtml and Manage.cshtml.cs inside folder Pages.

-
Open Manage.cshtml and paste this code inside it :
@page
@model ManageModel
@{
     ViewData["Title"] = "Manage";
}

<div class="text-center col-md-12">
     <div mt-4>
         <h1 class="display-4">
              Insert Data
         </h1>
     </div>
     <div>
         <form method="post">
             <div class="row">
                 <label asp-for="manage.Name" class="col-form-label">Name</label>
                 <input asp-for="manage.Name" class="form-control"/>
                 <span asp-validation-for="manage.Name" class="text-danger"></span>
             </div>
             <div class="row mt-3">
                 <label asp-for="manage.dateOfBirth" class="col-form-label">Birth Date</label>
                 <input asp-for="manage.dateOfBirth" class="form-control" type="date" value="@DateTime.Now.ToShortDateString()"/>
                 <span asp-validation-for="manage.dateOfBirth" class="text-danger"></span>
             </div>
             <div class="row mt-3 ">
                 <a asp-page="/Index" class="btn btn-primary mr-3">Back</a>
                 <button type="submit" class="btn btn-success">Save</button>
             </div>
         </form>
     </div>
</div>

@section Scripts {
     @{await Html.RenderPartialAsync("_ValidationScriptsPartial");}
}
-
Then, open Manage.cshtml.cs and paste this code :
using System;
using System.Threading.Tasks;
using Microsoft.AspNetCore.Mvc;
using Microsoft.AspNetCore.Mvc.RazorPages;

using Microsoft.EntityFrameworkCore;
using RazorPage.Data;
using RazorPage.Models;

namespace RazorPage.Pages
{
     public class ManageModel : PageModel
     {
         private readonly DefaultConnection _context;
         DateTime now = DateTime.Now;

         public ManageModel(DefaultConnection context)
         {
            _context = context;
         }

         [BindProperty]
         public Table_Razor_Page manage { get; set;}

         public ActionResult OnGet()
         {
             manage = new Table_Razor_Page();

             return Page();
         }

         public async Task<ActionResult> OnPost()
         {
             manage.dateTimeInsert = now;
             manage.dateTimeUpdate = now;

             await _context.Table_Razor_Page.AddAsync(manage);
             await _context.SaveChangesAsync();

             return RedirectToPage("Index");
         }
     }
}
-
Run the web application and try insert data and click save. When you finish insert data, you will see the data that you insert on page Index.cshtml.


-
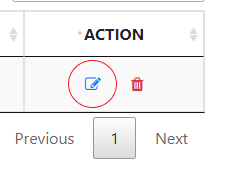
To create an update process, we gonna edit some code on Manage.cshtml and Manage.cshtml.cs because we already put a button on Index.cshtml such as this :

-
Open Manage.cshtml and edit the code like this :
@page "{handler?}/{id?}"
@model ManageModel
@{
     ViewData["Title"] = "Manage";
}

<div class="text-center col-md-12">
     <div mt-4>
         <h1 class="display-4">
             @if(Model.IsNull==true)
             {
                 <span>Insert</span>
             }
             else
             {
                 <span>Update</span>
             }
             Data
         </h1>
     </div>
     <div>
         <form method="post">
             <input asp-for="manage.ID" type="hidden"/>
             <div class="row">
                 <label asp-for="manage.Name" class="col-form-label">Name</label>
                 <input asp-for="manage.Name" class="form-control"/>
                 <span asp-validation-for="manage.Name" class="text-danger"></span>
             </div>
             <div class="row mt-3">
                 <label asp-for="manage.dateOfBirth" class="col-form-label">Birth Date</label>
                 @if(Model.IsNull==true)
                 {
                     <input asp-for="manage.dateOfBirth" class="form-control" type="date" value="@DateTime.Now.ToShortDateString()"/>
                 }
                 else
                 {
                     <input asp-for="manage.dateOfBirth" class="form-control" type="date" />
                 }
                 <span asp-validation-for="manage.dateOfBirth" class="text-danger"></span>
             </div>
             <div class="row mt-3 ">
                 <a asp-page="/Index" class="btn btn-primary mr-3">Back</a>
                 @if(Model.IsNull==true)
                 {
                     <button asp-page-handler="Insert" type="submit" class="btn btn-success">Save</button>
                 }
                 else
                 {
                     <button asp-page-handler="Update" type="submit" class="btn btn-success">Update</button>
                 }
             </div>
         </form>
     </div>
</div>

@section Scripts {
     @{await Html.RenderPartialAsync("_ValidationScriptsPartial");}
}
-
After that, open Manage.cshtml.cs and edit the code like this :
using System;
using System.Threading.Tasks;
using Microsoft.AspNetCore.Mvc;
using Microsoft.AspNetCore.Mvc.RazorPages;

using Microsoft.EntityFrameworkCore;
using RazorPage.Data;
using RazorPage.Models;

namespace RazorPage.Pages
{
     public class ManageModel : PageModel
     {
         private readonly DefaultConnection _context;
         DateTime now = DateTime.Now;

         public ManageModel(DefaultConnection context)
         {
            _context = context;
         }

         [BindProperty]
         public Table_Razor_Page manage { get; set;}

         public Table_Razor_Page update { get; set;}

         public bool IsNull { get; set; }

         public ActionResult OnGetInsert()
         {
             IsNull = true;
             manage = new Table_Razor_Page();

             return Page();
         }

         public async Task<ActionResult> OnGetUpdate(int? id)
         {
             if(id==null || id==0)
             {
                 return RedirectToPage("Index");
             }
             else if(id!=null && id!=0)
             {
                 IsNull = false;
                 manage = await _context.Table_Razor_Page.FirstOrDefaultAsync(x=>x.ID==id);
             }

             return Page();
         }

         public async Task<ActionResult> OnPostInsert()
         {
             manage.dateTimeInsert = now;
             manage.dateTimeUpdate = now;

             await _context.Table_Razor_Page.AddAsync(manage);
             await _context.SaveChangesAsync();

             return RedirectToPage("Index");
         }

         public async Task<ActionResult> OnPostUpdate()
         {
             update = await _context.Table_Razor_Page.FirstOrDefaultAsync(x=>x.ID==manage.ID);
             update.Name=manage.Name;
             update.dateOfBirth=manage.dateOfBirth;
             update.dateTimeUpdate = now;

             await _context.SaveChangesAsync();

             return RedirectToPage("Index");
         }
     }
}
-
Run your web app and click edit button on table.
-
Manage page will be open and you can see that the title is change and button also change.

-
Edit the data as you like and click update button.
-
Web app will redirect to page Index and as you can see, the data changed.


-
For this process we gonna edit the code inside Index.cshtml.cs. It is because we already include the code on Index.cshtml such as below :

-
Open Index.cshtml.cs and paste this code :

public Table_Razor_Page delete { get; set;}
-
Paste this code below OnGet method.

public async Task<ActionResult> OnPostDelete(int id)
{
     delete = await _context.Table_Razor_Page.FirstOrDefaultAsync(x=>x.ID==id);
     _context.Table_Razor_Page.Remove(delete);

     await _context.SaveChangesAsync();

     return RedirectToPage();
}
-
Run your application and try delete the data that you already insert before by clicking the delete button on the table.

-
As you can see the data that you delete already gone.


